Using Media
Images
Images can be added in your documents and posts easily with the following markdown:


The first part is alt text. This is text that displays if the image is not available, such as with a bad connection, or a user with low vision. This allows them to contextualize the purpose of the image with the rest of the text.
The second part is the path to the file. For example, the file img_demo.jpg is contained in the directory assets/images/tutorial at template-information-site/ on the final website. Make sure you include the extension too!
Note: Notice the
/template-information-site/part of the path. While the website might be stored onhttps://badgernested.github.io/template-information-site/, websites often treat the root of the website likehttps://badgernested.github.ioinstead. So, here, we must specify that it is in/template-information-site/.
Notice that inserting images this way only supports the image being inserted in its basic size, then being scaled to the maximum size allowed inside the content. If you want to display the image at a specific size, you will need to use the <img> HTML tag.
Banners
There are two images that are used for banners on the website:
assets/banner.jpg- The banner shown on the top navigation bar. This file should be no more than 100px tall (but at least 70px tall) and about 2000px long. I recommend saving as a.jpgfile to reduce file size. This image will tile across the entire banner, so you can also opt for a tiled design.assets/bottom_background.jpg- The banner shown on the bottom, in the footer. This file should be no more than 300px tall and about 2000px long. I recommend saving as a.jpgfile to reduce file size.assets/bottom_background_mobile.jpg- The banner shown on the bottom, in the footer, in mobile. Likeassets/bottom_background.jpg, but it’s a special asset so that blurring is not run on mobile layouts. You should apply a blur filter in this image so that the whole image is blurred out.
Here are what the images look like for reference:
assets/banner.jpg:
assets/bottom_background.jpg
assets/bottom_background_mobile.jpg
You can change them to whatever you want, but here are a few suggestions:
- Make sure that your design does not have high contrast designs, since they may be hard to read the text overlay.
- Do not make the file much larger than they need to be. It is true that it will scale, but they will get very large very fast!
- Experiment with tiled designs, since not only do they save space, but they can look very nice.
Disable the Banner
To disable the banner and just have plain color, you will need to mess with CSS a little bit.
Open the file _sass/color_base.scss in a text editor. Then, find all lines that look like this:
background-image: url("/template-information-site/assets/bottom_background.jpg");
and comment them out by putting // in the beginning of the line, like this:
// background-image: url("/template-information-site/assets/bottom_background.jpg");
Make sure you also do the same for lines that look like this:
background-image: url("/template-information-site/assets/banner.jpg");
And make them look like this:
// background-image: url("/template-information-site/assets/banner.jpg");
In _sass/mobile.scss, make sure you also comment the mobile footer, from this:
background-image: url("/template-information-site/assets/bottom_background_mobile.jpg");
to this:
// background-image: url("/template-information-site/assets/bottom_background_mobile.jpg");
Finally, to make sure Dark Mode disables the banner, do the same thing in the _sass/color_dark.scss file.
File Size
It’s important to respect people’s bandwidth and not upload files larger than you need to. Have you ever had a big picture in a website take forever to download? You don’t want to have your readers deal with that! Additionally, uploading smaller files makes it harder to steal the original, such as in the case of original artwork or photographs - people usually want higher resolution pictures so they don’t appear pixelated.
Generally, I like to keep my image files under 1 MB (measured in bytes or kilobytes), so they can load very quickly. You can see the size of a file when you look at it in your file explorer application on your computer, typically on the lower bar.
Keep images used for the sidebar 500x500 pixels or less. Images in the articles should be no more than 800x500 pixels. They will be scaled to fit the user interface, but its best to use the smallest image necessary for your purposes, so that it does not result in users having to download large images.
File Type
When using a file type, consider what each file type is useful for.
| File |
File |
Image |
Trans |
Anima |
Best |
|---|---|---|---|---|---|
| JPG, JPEG | Small | Lower | No | No | Photographs, Screenshots |
| PNG | Medium | Lossless | Yes | No | Artwork, Transparent Pictures, Cartoons |
| BMP | High | Lossless | No | No | When You Need Exact 1-1 Pixels |
| GIF | Low | Low (256 color limit) | Yes | Yes | Sprites, Animated Pictures |
| SVG | Variable | High (Vector) | Yes | No | Vector Graphics |
Audio and Video
You can embed audio and video on your websites as well. There are two ways you can embed this content: You can either embed it directly from a third-party website, like YouTube, Spotify or Soundcloud (you can also do this with non-media embeds as well), or you can embed content uploaded directly onto your website.
Note: Never autoplay audio and video media, they can not only be distracting, but interfere with a user’s ability to access the rest of your content. Always allow the user to use the controls.
Embedding from Other Websites
You can embed media from other websites, for example, Youtube.
Note: Most embedded media will trigger tracker privacy plugins like Privacy Badger to block the media because of trackers. The user can optionally disable this blocking so they can interact with the media.
YouTube
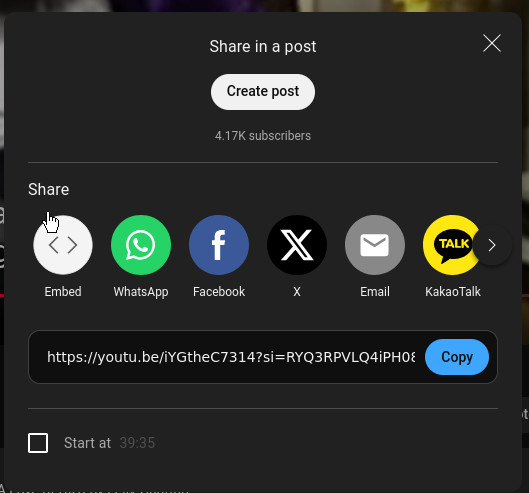
You can get the embed code by going to the video you want to embed by clicking “Share” on the video. You should see a screen that looks like this:

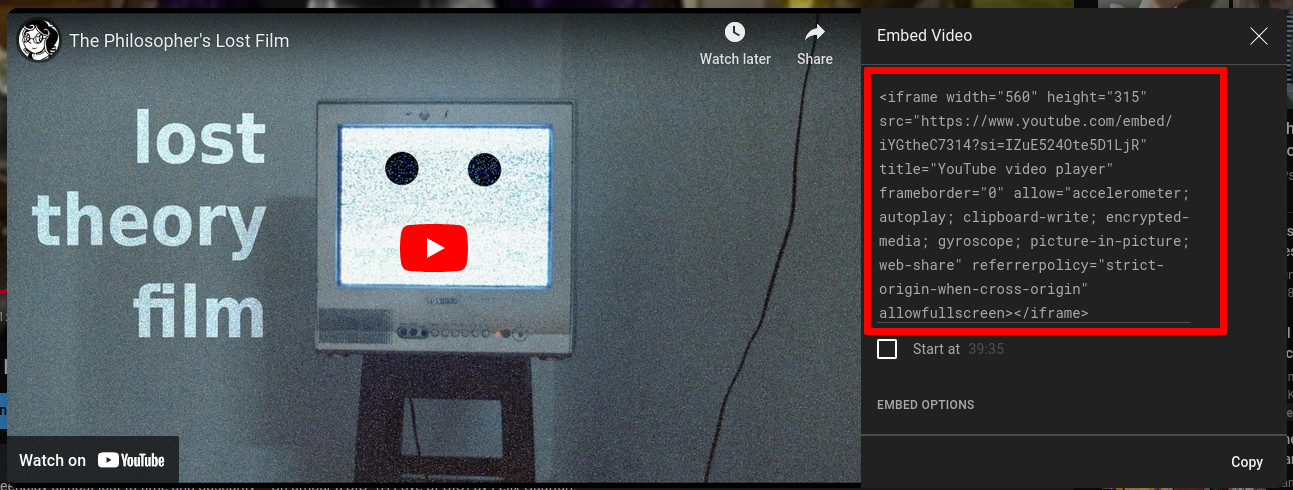
Embed is the first, far left option. Click that, and you should see a screen that looks like the following:

The text circled in red on the right side of the screen is the text you want to copy. If you copy this text and place it in your document, it will look something like this:
Note: If you want to remove the tracker information, remove the part in the
srcdefinition after?si=. This is tracker information. In this example, the tracker information was removed. You’re welcome!
Markdown:
<iframe width="560" height="315" src="https://www.youtube.com/embed/iYGtheC7314" title="YouTube video player" frameborder="0" allow="accelerometer; autoplay; clipboard-write; encrypted-media; gyroscope; picture-in-picture; web-share" referrerpolicy="strict-origin-when-cross-origin" allowfullscreen></iframe>
Soundcloud
Embedding media from Soundcloud is a similar process to YouTube.
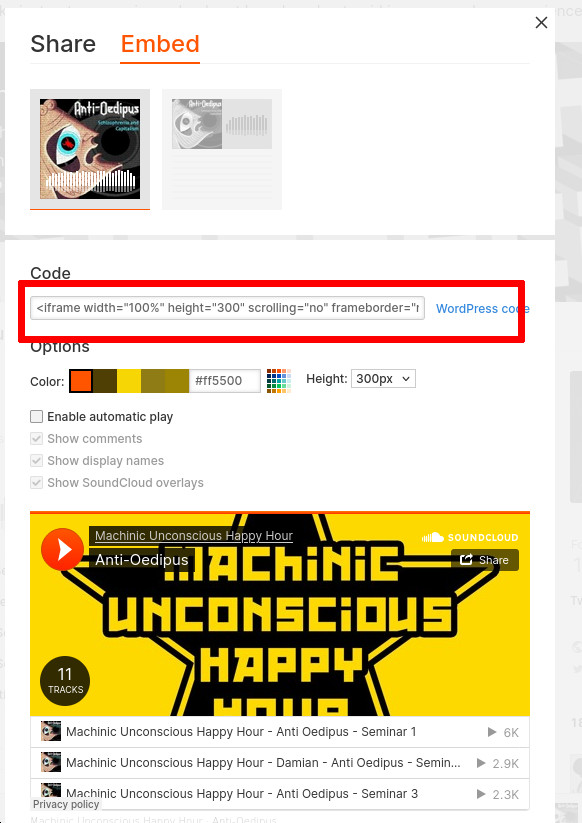
First, find the “Share” button for the media you want to share.

Then, select its embed code similar to how you can for a YouTube video. You can customize many things about your embed link to make it look more appealing on your layout.
HTML:
<iframe width="100%" height="300" scrolling="no" frameborder="no" allow="autoplay" src="https://w.soundcloud.com/player/?url=https%3A//api.soundcloud.com/playlists/1285533037&color=%23ff5500&auto_play=false&hide_related=false&show_comments=true&show_user=true&show_reposts=false&show_teaser=true&visual=true"></iframe><div style="font-size: 10px; color: #cccccc;line-break: anywhere;word-break: normal;overflow: hidden;white-space: nowrap;text-overflow: ellipsis; font-family: Interstate,Lucida Grande,Lucida Sans Unicode,Lucida Sans,Garuda,Verdana,Tahoma,sans-serif;font-weight: 100;"><a href="https://soundcloud.com/podcast-co-coopercherry" title="Machinic Unconscious Happy Hour" target="_blank" style="color: #cccccc; text-decoration: none;">Machinic Unconscious Happy Hour</a> · <a href="https://soundcloud.com/podcast-co-coopercherry/sets/anti-oedipus" title="Anti-Oedipus" target="_blank" style="color: #cccccc; text-decoration: none;">Anti-Oedipus</a></div>
Spotify
Embedding from Spotify is similar to YouTube and Soundcloud, however it is a little tricky to find.
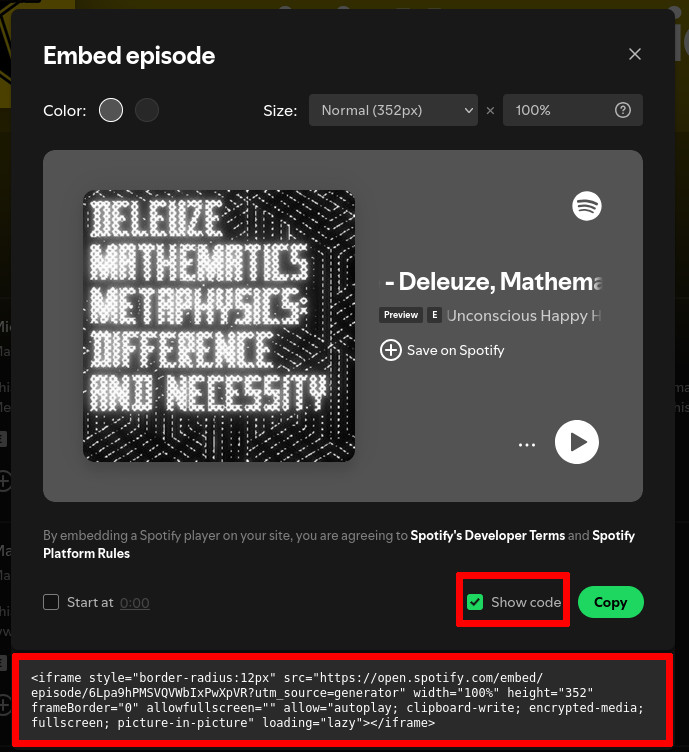
First, click on “Share”, then “Embed” for the song or episode you want to embed.

You will see a screen that looks much like this one. However, where is the embed code? You need to click on the button “Show code” to show the code for your embed link. Don’t forget to change any settings you might want to before copying the code. When you’re ready, click “Copy” and it will copy the code to the clipboard. With the code copied, you can place it in your website like so:
HTML:
<iframe style="border-radius:12px" src="https://open.spotify.com/embed/episode/6Lpa9hPMSVQVWbIxPwXpVR?utm_source=generator" width="100%" height="352" frameBorder="0" allowfullscreen="" allow="autoplay; clipboard-write; encrypted-media; fullscreen; picture-in-picture" loading="lazy"></iframe>
Self-Hosting
Optionally, you can host the audio or video file yourself on your GitHub or your own server.
Note: Try to avoid hosting large video and audio files yourself, especially on GitHub. These files can get pretty big. Restrict your file size below 10 MB to prevent problems. Additionally, content that is directly hosted is not streamed as well as services like YouTube. This might lead to long load times.
Audio
You can embed audio using HTML tags.
First, you should add your audio files to documents. Make sure you have an .ogg format and .mp3 format, so that browsers can select which format is best. Then, you can link them here.
Audio description: A pleasant 8-bit song.
HTML:
<audio controls>
    <source src="/template-information-site/documents/sanctuary.ogg" type="audio/ogg">
    <source src="/template-information-site/documents/sanctuary.mp3" type="audio/mpeg">
    Your browser does not support the audio tag.
</audio>
Video
You can embed video using HTML tags.
First, you should add your video files to documents. Then, you can link them here.
Description: Felix’s life is going crazy while Gilles watches in dismay. He always is available to help out a friend by giving him moral support. The music is 8-bit music.
HTML:
<video width="320" height="240" controls>
    <source src="/template-information-site/documents/felix_movie.mp4" type="video/mp4">
    <track src="/template-information-site/documents/felix_movie_subtitles.vtt" kind="subtitles" srclang="en" label="English">
Your browser does not support the video tag.
</video>
Media Accessibility Practices
Alt Text
Alt text should always be provided for any images. This way, people with low vision or slow internet connections can have an alternative to image-based content.
The text should not only describe the content of the picture, but how the picture is relevant in communicating something to the reader. For example, the alt text for the image below is “A photo of a bird flying. This photo demonstrates how alt-text can be used to illustrate purposeful descriptions.”

Transcription
All audio, including audio in video, should be accompanied with a transcript so that people can go through the contents in a text friendly format, if appropriate.
There are ways to add caption tracks to video hosted on websites like YouTube. Additionally, you can use a .vtt file, which defines captions for video files hosted online. These are managed with the <track> tag. You can attach it to a video like this:
<track src="/template-information-site/documents/felix_movie_subtitles.vtt" kind="subtitles" srclang="en" label="English">
To learn more on how to write your own .vtt files, click here.
Audio Description Text
If your audio in your video is particularly important in signifying important events, you should also include these sound effects in your transcription, so that hearing-impaired users and users without audio can tell important details.
No Autoplaying
Remember, to never make music or video auto-playing on load, and to make sure that audio/video controls are easily visible and accessible in your layout so that they can be easily turned on or off. Also, in addition to a transcript, the text around the audio or video should explain the content of the audio or video, so that users can be aware of the audio/video’s contents before accessing the media.
Embedded Media
Generally, you should not mess with embeds since a screen-reader user will know they have accessed an embed and the responsibility of proper accessibility labeling is really placed on the distributor of the embed.
YouTube does provide auto-transcription for most of its videos with speech. However, this transcription can be dodgy. If you’re uploading YouTube videos that you’re embedding in your website, make sure you include transcriptions. The easiest way to do it is to just use the script you used in recording.
I don’t know much about Spotify or Soundcloud’s services. I think it’s acceptable to assume that responsibility for accessibility is placed on the uploader and not yourself.
Even with all this in mind, transcription on the site would still be valuable, as long as you have the rights to distribute the text on your website, because it allows for ease of access for the content in the form of text. Users can easily search for text or access the material when they are unable to listen to it.